Light tip. How to light a subject with light coloured hair
Every subject is different and has different characteristics, that's why we have to light every subject with different light: lighting is a powerful tool to hide or enhance features in a portrait. Here are some tips about how to light a subject with light coloured hair.Do lower the contrast of the illumination: in this way you'll avoid the hair to pop up.
Do leave the hair in shadows: alternatively you could diffuse the light on the area.
Do lower the camera angle: you'll get less hair in the frame and therefore less exposure problems.
Hope you find it useful! Stay tuned for more lighting tips!
––––––––––––––––––––––––––––––––––––––––––––––––––––––––––––––––
––––––––––––––––––––––––––––––––––––––––––––––––––––––––––––––––
Light tip. How to light a subject with a narrow face
Every subject is different and has different characteristics, that's why we have to light every subject with different light: lighting is a powerful tool to hide or enhance features in a portrait. Here are some tips about how to light a subject with narrow face.
Do not use a high Key Light: placing the light too high will narrow the face even more.
Do use a broad Key Light: remember, a broad key light widens while a narrow key light slims.
Do lower the contrast of light: so the narrow face won't look as narrow as it really is.
Hope you find it useful! Stay tuned for more lighting tips!
––––––––––––––––––––––––––––––––––––––––––––––––––––––––––––––––
––––––––––––––––––––––––––––––––––––––––––––––––––––––––––––––––
Light tip. How to light a subject with large nose
Every subject is different and has different characteristics, that's why we have to light every subject with different light: lighting is a powerful tool to hide or enhance features in a portrait. Here are some tips about how to light a subject with large nose.
Do not use a harsh Key Light:
it will creates deep shadows and make the nose look larger. Also,
avoid emphasizing the shadow of the nose for the same reason.
Do not use a wide angle lens close to the subject:
a wide angle lens changes the relative size of the objects so, the
closer you'll get to the subject the larger the nose will appear. Use a
telephoto lens instead to control and reduce proportions.
Do use a frontal Key Light: it will minimize shadows; but avoid placing it high.
Do use the camera at a low angle:
it will change the perspective and the nose will not appear as large.
If it is not possible, frame the whole head in the shot and tell the
subject to tilt the head up a bit: you will get the same effect.
Hope you find it useful! Stay tuned for more lighting tips!
––––––––––––––––––––––––––––––––––––––––––––––––––––––––––––––––
Light tip. How to light a subject with wrinkles
Every subject is different and has different characteristics, that's why we have to light every subject with different light: lighting is a powerful tool to hide or enhance features in a portrait. Here are some tips about how to light a subject with a wrinkled face.
Do not use a harsh Key Light: it will produce deep strong shadows and intensify wrinkles.
Do not use Back Light on one side: a side light enhances textures: placing a back light on one side of the subject will emphasize wrinkles.
Do use a frontal Key Light:
a light placed in front of the subject will reduce textures. Avoid
placing it too high or you will have the same negative effect of a side
light. Place it low instead.
Do use soft low Fill Light: it will fill up the shadows of the wrinkles created by the Key Light. Lowering the contrast will also help to mask wrinkles.
Hope you find it useful! Stay tuned for more lighting tips!
––––––––––––––––––––––––––––––––––––––––––––––––––––––––––––––––
The psychology of colour in cinematography. A study of the Last Emperor
Vittorio Storaro is one of the best cinematographers of all time. We can admire his magnificent use of light in film that will remain in our memories, like Apocalypse Now, Last tango in Paris, 900, Dick Tracy and, The Last Emperor. In the latter, his studies and experiments with colours as a mean to communicate emotions reach a high grade of expressive maturity that powerfully enhances the already magnificent cinematography of the film. As you all know, the film deals with the last emperor of China, from his birth till he becomes just another worker of the People's Republic of China, it is an introspective story of the Emperor. According to Storaro, every particular colour is not only a bridge with a particular emotion but light and colour make react body and mind in different ways (daylight is associated with activity, for example, while night is with reflection); colours can also be associated with a particular age of our life, so he decided to separate the different ages of the Emperor chromatically, lighting with different tone of lights accordingly to the age and mood. But he didn't limit himself to just play with hues, he also created contrast with colours (as he already did in Apocalypse now) and played with the colour of objects in scenes using what in literature is called anaphora, a repetition of the same colour, in our case, to emphasize a concept.

In
The Last Emperor's first scene we see a group of prisoners arriving to a
station and waiting for being transferred to a prison. The Emperor is
among them. The scene is quite dark, in a grey tone, with practically no
colour. Grey is an undefined colour; it represents the waiting, the reflection, the preparation for a new journey, for the start of a new life. All the scenes in which the Emperor is in jail are in grey.
 While
at the station, the Emperor try to commit suicide, which is itself a
symbol of death and rebirth, and we see the first colour: the red of the blood. The following scene opens with big red doors opening; the baby emperor is taken away from her mother; all this scenes have red tones. Red is the first colour of the chromatic scale. It symbolizes the birth, the vital impulse, the start of every thing
(later, when the emperor gets married, red will be the predominant
colour in objects in the scene). In the first scene it also symbolizes,
of course, Communism and its effects on the Emperor
While
at the station, the Emperor try to commit suicide, which is itself a
symbol of death and rebirth, and we see the first colour: the red of the blood. The following scene opens with big red doors opening; the baby emperor is taken away from her mother; all this scenes have red tones. Red is the first colour of the chromatic scale. It symbolizes the birth, the vital impulse, the start of every thing
(later, when the emperor gets married, red will be the predominant
colour in objects in the scene). In the first scene it also symbolizes,
of course, Communism and its effects on the Emperor The second colour is orange. It is associated with the range of age between 5 and 8 years; it leads us into the life, it is the warmth of the family, the domestic colour. In the scenes with orange tone, Pu Yi arrives to the Forbidden City, to his new family.

 Pu Yi is still a child when he becomes emperor: the tone of the scene becomes yellow. Yellow can be associated to 10 to 15 years of age; it is the colour of puberty, it's intuition and awareness. It is the colour of light, it symbolizes the sun, the divine
and its presence, it's the colour of the empire. Storaro uses it
throughout the film not only as a tone but even placing in the scene
objects of this colour, like the scene of the little emperor playing
with the yellow banner which lifts up revealing the courtyard of
the Forbidden City full of eunuchs: the rise of the emperor above his
subjects.
Pu Yi is still a child when he becomes emperor: the tone of the scene becomes yellow. Yellow can be associated to 10 to 15 years of age; it is the colour of puberty, it's intuition and awareness. It is the colour of light, it symbolizes the sun, the divine
and its presence, it's the colour of the empire. Storaro uses it
throughout the film not only as a tone but even placing in the scene
objects of this colour, like the scene of the little emperor playing
with the yellow banner which lifts up revealing the courtyard of
the Forbidden City full of eunuchs: the rise of the emperor above his
subjects.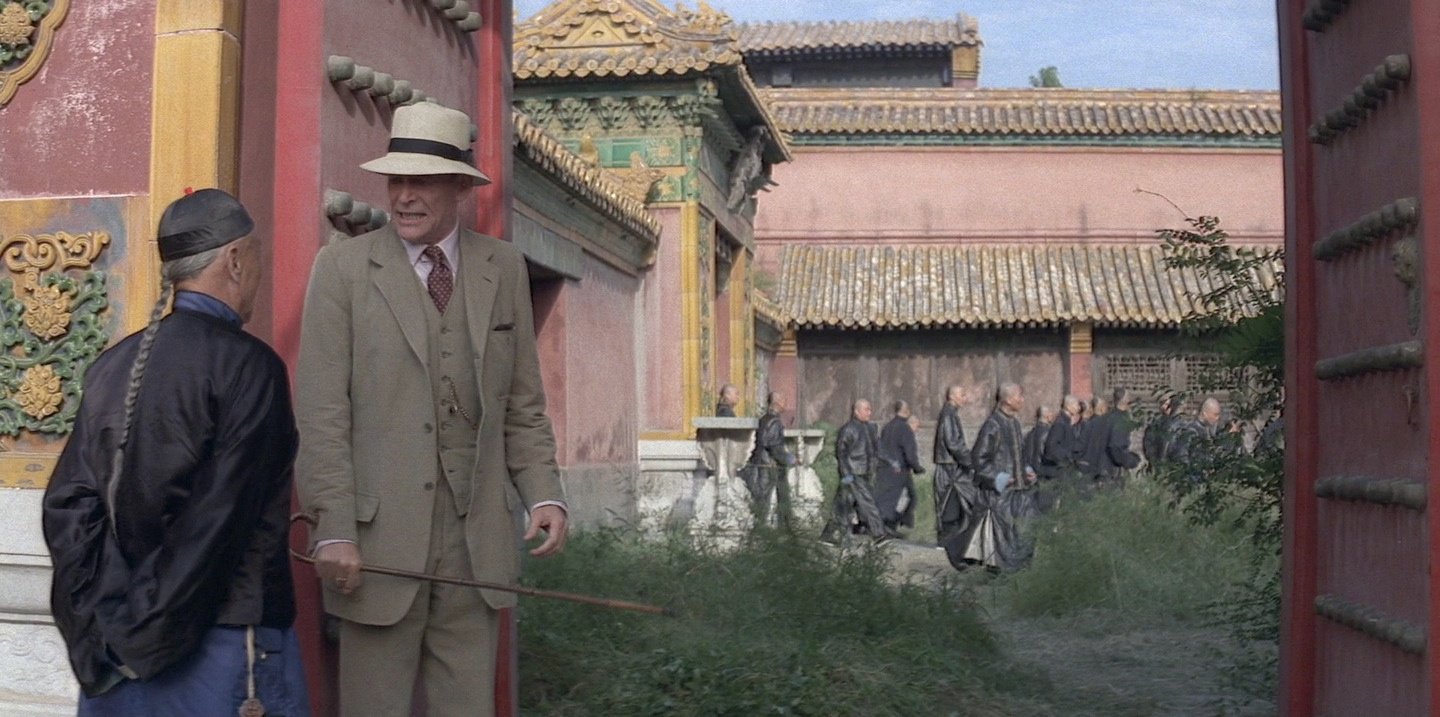
 Till
this moment the chromatic world of the film is quite poor: red, orange
and yellow, alternated with the grey of the scenes of the prisons. Pu Yi
has been living in the Forbidden City, ignoring the world outside it;
when he starts to acknowledge the existence of that world, the
chromatic scale expands along with this knowledge. This change is
represented by green, the colour of spring, of the nature that flourishes, of life that starts again. It represents the age around the 20 years, the study, the knowledge that takes us to freedom. It is brought with the introduction of the British tutor and the green bicycle he gave the emperor as a present.
Till
this moment the chromatic world of the film is quite poor: red, orange
and yellow, alternated with the grey of the scenes of the prisons. Pu Yi
has been living in the Forbidden City, ignoring the world outside it;
when he starts to acknowledge the existence of that world, the
chromatic scale expands along with this knowledge. This change is
represented by green, the colour of spring, of the nature that flourishes, of life that starts again. It represents the age around the 20 years, the study, the knowledge that takes us to freedom. It is brought with the introduction of the British tutor and the green bicycle he gave the emperor as a present.
 The centre of our life is represented by blue. It is the colour of freedom, perspicacity of thinking, the intellect; while red is the past and green the present, blue is the colour of the future.
It is the complementary of yellow: while the latter represents the sun,
blue is associated with the moon. The tone of the scenes changes into
blue when the Emperor leaves the Forbidden City for the first time,
exiled by communist: he always wanted to leave his "prison", his limited
world but never could because they wouldn't let him. The exile is his
freedom.
The centre of our life is represented by blue. It is the colour of freedom, perspicacity of thinking, the intellect; while red is the past and green the present, blue is the colour of the future.
It is the complementary of yellow: while the latter represents the sun,
blue is associated with the moon. The tone of the scenes changes into
blue when the Emperor leaves the Forbidden City for the first time,
exiled by communist: he always wanted to leave his "prison", his limited
world but never could because they wouldn't let him. The exile is his
freedom. When Pu Yi realizes he want to be again the Emperor of China, the tone of the images becomes indigo. It is the colour associated to the age around 50. Indigo represents full maturity, material power, the achievement of a level of life, a new balance between reason and passion.

During
the years Pu Yi is held in prison, the Chinese Government tries to
re-educate him to communism. The tone of the scene shot in the prison is
always been grey but, as soon has Pu Yi starts to accept his
responsibility a violet tone appears. Violet is the full balance between passion and reason, is the diffusion of knowledge, it represents the cyclic nature of life and the age between 70 and 80.

 White is the sum of all the colours, therefore it is the sum of all the ages, of all the phases, feelings and passions. It is life as one, the union and the completeness of it
and it is associated with the last years of life. The pure white
appears for the first time with snow, when Pu Yi earns his freedom and
gets out from jail as a free citizen of the People's Republic of China.
He returns to the Forbidden City but this time the image is balanced,
with no prevailing tone.
White is the sum of all the colours, therefore it is the sum of all the ages, of all the phases, feelings and passions. It is life as one, the union and the completeness of it
and it is associated with the last years of life. The pure white
appears for the first time with snow, when Pu Yi earns his freedom and
gets out from jail as a free citizen of the People's Republic of China.
He returns to the Forbidden City but this time the image is balanced,
with no prevailing tone.
Throughout the film there's one more colour which is always present: black. It is the matrix, the matter, the birth of elements. It is the beginning and the end, the presence and the absence of something and, of course, the unconscious.
The Last Emperor is not only an example of great cinematography by Storaro,
it is the demonstration that philosophy, psychology, history, painting
and every kind of art go hand by hand with cinematography to achieve a
creative and unique way to visually tell a story, it is a must-see film
for every cinematographer, Dp or photographer who wants to improve his
art.
––––––––––––––––––––––––––––––––––––––––––––––––––––––––––––––––
Light tip. How to light a subject with deep-set eyes
Every subject is different and has different characteristics, that's why
we have to light every subject with different light: lighting is a
powerful tool to hide or enhance features in a portrait. Here are some
tips about how to light a subject with deep-set eyes.
Do not use a harsh Key Light: a harsh light will produce heavy deep shadows that will intensify the deepness.
Do not use a wide angle lens
close to the subject: it increases distance between objects changing
the apparent relationship between them, so the deep-set eyes would
appear more sunken then they are.
Do use a low soft Fill Light:
placing a Fill Light lower than the eyes will brightening them up
eliminating the shadows. You could also use a reflector to bounce light
up, as well as lowering the Key Light; and remember, softer the light,
softer the shadows.
Do place the camera at lower angles: this will change the perspective, making the back-set eyes less perceptible.
Hope you find it useful! Stay tuned for more lighting tips!
––––––––––––––––––––––––––––––––––––––––––––––––––––––––––––––––
Light tip. How to light a bald subject
Every subject is different and has
different characteristics, that's why we have to light every subject
with different light: lighting is a powerful tool to hide or enhance
features in a portrait. Here are some tips about how to light a bald
subject.
Don't place the Key Light too high: it will reduce reflections and will shade the head.
Don't use a strong Rim Light: a very strong illuminated outline will highlight the baldness.
Throw some shadows on the area: it will darken the area not showing the baldness. To achieve this you could also use some local diffusion.
Try lowering the camera:
a lower point of view will hide the superior part of the head. For
certain shots, framing the subject cutting the forehead may help too.
Avoid using the Rim Light: with no Rim Light separating the subject from the background, you will create a sfumato, where the subject and the background will softly blend into each other, hiding the baldness.
Hope you find it useful! Stay tuned for more lighting tips!
––––––––––––––––––––––––––––––––––––––––––––––––––––––––––––––––
Know light. How to control light. Tools and tips
Either if you shooting in a studio
or outdoor, you have different ways to control and modify the light to
get the the atmosphere you want. here are some of them.
Reflectors.
The most popular light modifiers, they consist in a special piece of
fabric over a frame and they bounce back the to the subject the light of
a light-source. They can be differently coloured, being the most used
white, silver and golden; each one of the colour will bounce a different
kind of light, softer or harsher or , with the golden surface, warmer.
White boards can be also used as reflectors, but not everyone of them is
suitable for photographic purposes: the nature of the material or the
painting can generate colour casts on the subjects, so you need
something which reflects pure white , like a piece of expanded
polystyrene.
 Softboxes.
Mounted directly on the flash head, they produce a soft, involving and
diffused light generating a soft edge shadow, They come in different
shapes (square, rectangular, octagonal) and sizes to proper illuminate
depending on the size of the area we want to light. For some
photographers, the use of big soft boxes and its characteristics makes
unnecessary the use of a Fill light.
Softboxes.
Mounted directly on the flash head, they produce a soft, involving and
diffused light generating a soft edge shadow, They come in different
shapes (square, rectangular, octagonal) and sizes to proper illuminate
depending on the size of the area we want to light. For some
photographers, the use of big soft boxes and its characteristics makes
unnecessary the use of a Fill light.
Umbrellas.
They produce a wide and soft light and, if shooting subjects, a bright
spot on the tip of the nose. There are two kinds of umbrellas, the ones
which bounce back the light and the translucent ones which allow light
to pass trough diffusely.
Snoots.
Tubes or similar objects that fit over a studio light and help to
control the direction of light concentrating it in a small beam. they
can have a cylindrical, conical or rectangular shape. Snoots highlight a
specific area of the scene leaving other areas in shadow.
Honeycomb grids.
They are grids mounted on snoot, softboxes, head lamps which narrow the
beam of light to a circle with soft edges. They have different degrees
to a better control of light: the smaller the degree, the smaller the
beam and the soft edge.
Beauty dish.
It is a parabolic reflector mounted on a lamp head that focuses the
light towards a point though in a soft and wrapping way. It is
especially used in fashion portrait as an alternative to soft-boxes when
a more contrasty and dramatic look is wanted.
Flags.
They are black panels that absorb light and stop it to reach a specific
area of the scene, deepening the shadows and creating contrast. The
also prevent light spill into the lens. The closer they are placed to
the light source, the softer will be the shadow.
 Filters.
All objects that intercept light and let it pass trough without
modifying the lens focal lens are filters. They can be colour gel or
colour filter by which colour temperature and colour balance is
controlled, colour filters to control contrast, density filters to
control the quantity of light, blocking filter to block radiations,
polarizing filters to control the direction of light... this theme is so
extensive we need a dedicated post to talk about it. The most commonly
used are colour filters; they are thin transparent coloured sheets that
are placed in front of the light intercepting the beam. They come in
different colours to proper balance the light being the most used the
CTO (orange) and CTB (blue). Another very used filter is the diffusion
filter which softens light. They have different intensities and not
really a long life: lamp heat will melt them or make the colour fade, so
depending on the energy absorbed, they need to be often changed.
Filters.
All objects that intercept light and let it pass trough without
modifying the lens focal lens are filters. They can be colour gel or
colour filter by which colour temperature and colour balance is
controlled, colour filters to control contrast, density filters to
control the quantity of light, blocking filter to block radiations,
polarizing filters to control the direction of light... this theme is so
extensive we need a dedicated post to talk about it. The most commonly
used are colour filters; they are thin transparent coloured sheets that
are placed in front of the light intercepting the beam. They come in
different colours to proper balance the light being the most used the
CTO (orange) and CTB (blue). Another very used filter is the diffusion
filter which softens light. They have different intensities and not
really a long life: lamp heat will melt them or make the colour fade, so
depending on the energy absorbed, they need to be often changed.
Barn doors.
if you are shooting with continuous light yo have an extra tools: barn
doors. They are metal flaps attached to a square frame on the lamp head.
They block the light coming out from the source allowing to illuminate a
specific area of the scene. They can be moved in different angles but
be careful! always use gloves when manipulating them because they get
really hot.
Cine Foil.
Can you imagine barn doors which are very flexible and malleable, on
where you can make cut-outs of any shape you want to create original
light patterns? That is a cine foil, a black aluminium foil most used in
cinematographic productions.
As you see, there
are several tools to control lights. Use them creatively to get
different and original results, go and experiment with them!
––––––––––––––––––––––––––––––––––––––––––––––––––––––––––––––––
Light tip. Preventing power surge damage: how tu turn the lights on.

Are you going to light a scene? Remember that when you turn the light on, the electric intensity goes up around 20% than the normal
(i.e.: when light is normally on). For example, let's say you have 3
Tungsten lamps of 1000w each and the maximum power your installation can
offer is 3300w. Which is fine because you only need 3000w in total: you
still have enough watts to connect your PC and a battery charger.
But,
if you add that 20% extra lights need to be turned on, you'll find
yourself that you are exceeding the maximum power by 300w:
3 x 1000w = 3000w
20% of 3000w = 600w
3000w + 600w = 3600w > 3300w
In order to protect your equipment
(or the one you are renting) you should always turn the lights on one
by one, leaving enough room for the light to get that 20% extra of
energy needed.
Now that lights are on, start shooting!
––––––––––––––––––––––––––––––––––––––––––––––––––––––––––––––––
––––––––––––––––––––––––––––––––––––––––––––––––––––––––––––––––
HMI lights: from cinema industry to photographic sessions. A review of Profoto ProDaylight 800 air
An HMI light is a
metal-halide gas discharge lamp with two electrodes of medium arc
separation which excite the mercury vapour to emit light. They provides a
very high output and better efficiency than common incandescent lamps;
they also have a high colour rendering index (CRI), never below 90
value.
 An HMI light spectrum is very similar to daylight spectrum,
this is why it can be used in exteriors without the need of colour
correcting by filters and, because of their high emission, they are used
to simulate the sun. They need a ballast to operate and make them
flicker free and, depending on the lamp, they need around 5 minutes for
all the parameters (tension, intensity, power, temperature) to stabilize
and operate correctly. Turning them on and off affects lamps life
and never they should be turned off throughout the 5 minutes-switch-on
process. Their life time should neither ever be extended more than 25% because risk of explosions may increase.
An HMI light spectrum is very similar to daylight spectrum,
this is why it can be used in exteriors without the need of colour
correcting by filters and, because of their high emission, they are used
to simulate the sun. They need a ballast to operate and make them
flicker free and, depending on the lamp, they need around 5 minutes for
all the parameters (tension, intensity, power, temperature) to stabilize
and operate correctly. Turning them on and off affects lamps life
and never they should be turned off throughout the 5 minutes-switch-on
process. Their life time should neither ever be extended more than 25% because risk of explosions may increase.
Colour temperature is another issue of HMI lamps: with age the arc length becomes larger and needs more voltage which makes colour temperature decrease (estimated in less than 1 Kelvin per working hour).
HMI lights are most used in cinema industry and the most known manufacturer is ARRI; because of weight and high heat emitted their use wasn't suitable for photography, unless in very specific mise en scène. But lately Profoto launched on the market a new HMI light with characteristics that make its use in a common photographic shooting possible.
 It
only weights about 2,3 Kg and its low heat emission allows the
photographer to use traditional light shaping tools, including umbrellas
and softboxes (only the HR series thou). The 5600 K colour temperature
makes it perfect to work with balanced day light film or along with
flash light (the combination between these 2 light creates a wonderful
peachy skin tones) or sunlight and, unlike normal HMI, it can be held in
zenith position without any problems.
It
only weights about 2,3 Kg and its low heat emission allows the
photographer to use traditional light shaping tools, including umbrellas
and softboxes (only the HR series thou). The 5600 K colour temperature
makes it perfect to work with balanced day light film or along with
flash light (the combination between these 2 light creates a wonderful
peachy skin tones) or sunlight and, unlike normal HMI, it can be held in
zenith position without any problems.
But the maximum wattage of the Profoto lamp is 800w which can be a bit of a problem with diaphragm aperture: photographers who normally shoot at ƒ11 or ƒ16 won't be able to achieve these apertures if they don't use some reflectors that allow to gain 1-1 and 1/2 stop along with a faster ISO, solution that is not always an happy one. For this reason I think that, unless you are comfortable with shooting at ƒ5,6 or ƒ8, Profoto HMI light are far better used as fill, rim or back light instead of as a key light.
––––––––––––––––––––––––––––––––––––––––––––––––––––––––––––––––
 An HMI light spectrum is very similar to daylight spectrum,
this is why it can be used in exteriors without the need of colour
correcting by filters and, because of their high emission, they are used
to simulate the sun. They need a ballast to operate and make them
flicker free and, depending on the lamp, they need around 5 minutes for
all the parameters (tension, intensity, power, temperature) to stabilize
and operate correctly. Turning them on and off affects lamps life
and never they should be turned off throughout the 5 minutes-switch-on
process. Their life time should neither ever be extended more than 25% because risk of explosions may increase.
An HMI light spectrum is very similar to daylight spectrum,
this is why it can be used in exteriors without the need of colour
correcting by filters and, because of their high emission, they are used
to simulate the sun. They need a ballast to operate and make them
flicker free and, depending on the lamp, they need around 5 minutes for
all the parameters (tension, intensity, power, temperature) to stabilize
and operate correctly. Turning them on and off affects lamps life
and never they should be turned off throughout the 5 minutes-switch-on
process. Their life time should neither ever be extended more than 25% because risk of explosions may increase.Colour temperature is another issue of HMI lamps: with age the arc length becomes larger and needs more voltage which makes colour temperature decrease (estimated in less than 1 Kelvin per working hour).
HMI lights are most used in cinema industry and the most known manufacturer is ARRI; because of weight and high heat emitted their use wasn't suitable for photography, unless in very specific mise en scène. But lately Profoto launched on the market a new HMI light with characteristics that make its use in a common photographic shooting possible.
 It
only weights about 2,3 Kg and its low heat emission allows the
photographer to use traditional light shaping tools, including umbrellas
and softboxes (only the HR series thou). The 5600 K colour temperature
makes it perfect to work with balanced day light film or along with
flash light (the combination between these 2 light creates a wonderful
peachy skin tones) or sunlight and, unlike normal HMI, it can be held in
zenith position without any problems.
It
only weights about 2,3 Kg and its low heat emission allows the
photographer to use traditional light shaping tools, including umbrellas
and softboxes (only the HR series thou). The 5600 K colour temperature
makes it perfect to work with balanced day light film or along with
flash light (the combination between these 2 light creates a wonderful
peachy skin tones) or sunlight and, unlike normal HMI, it can be held in
zenith position without any problems.But the maximum wattage of the Profoto lamp is 800w which can be a bit of a problem with diaphragm aperture: photographers who normally shoot at ƒ11 or ƒ16 won't be able to achieve these apertures if they don't use some reflectors that allow to gain 1-1 and 1/2 stop along with a faster ISO, solution that is not always an happy one. For this reason I think that, unless you are comfortable with shooting at ƒ5,6 or ƒ8, Profoto HMI light are far better used as fill, rim or back light instead of as a key light.
––––––––––––––––––––––––––––––––––––––––––––––––––––––––––––––––
Know light. Lighting set-ups (IV).
Missed part III? read it here.
Rim Lighting.
If the Key light is placed behind the subject only the outline will be
illuminated leaving the subject in shadow. It is used to create
silhouettes and express a sense of mystery and intrigue in a very
artistic way. You can choose to soften the effect by placing a Fill
light or a reflector in font of the subject. Rim lighting is very often used in conjunctions with more lights because it helps to separate the subjects from the background and to highlight hair.


Back lighting. When the rim lighting is not that extreme we have a light set-up which is especially used for translucent objects like bottles and glasses.
The key light is normally doubled: two lights of equal power are placed
on both side of the subject. You can either choose to light directly
the subject or bounce the light with a white background. In both cases
you have to be careful with light spills: to prevent this you need to use flags and lens hood.

High key lighting.
This set-up is characterized for very bright mid tones, intentionally
blown highlights and very few shadows. The key light is positioned on
one side of the subject at 45º, while the fill light in the opposite
side at the same degree. The background has to be white and illuminated
by two background lights of the same power.

All these lighting set-ups are really variations of the triangle set-up we seen in this post. These are the basis but you have to feel free to add or remove lights,
change positions, directing the subject towards one light or another
and move around: you'll see how light and its effects change by doing
so. This is the best way of learning to master light: practise and
experiment.
––––––––––––––––––––––––––––––––––––––––––––––––––––––––––––––––
Know light. Lighting set-ups (III). Rembrandt, Loop, Butterfly and Side light
Missed part II? read it here
Depending on where and how you position lights you'll be using different lighting set-ups with different results . Let's go through them!
 Rembrandt lighting.
It borrows the name from the famous Dutch painter who created and used
this technique in his paintings. The Key light is on one side of the
camera at a precise degree and height in order to produce the main
characteristic of this set-up: a triangle of light beneath the eye
opposite the light-source, produced by the shadow of the nose. To soften the harsh light you can place a Fill light on the other side of the camera or you could fill up the shadows by bouncing the key light back with a reflector.
Rembrandt lighting.
It borrows the name from the famous Dutch painter who created and used
this technique in his paintings. The Key light is on one side of the
camera at a precise degree and height in order to produce the main
characteristic of this set-up: a triangle of light beneath the eye
opposite the light-source, produced by the shadow of the nose. To soften the harsh light you can place a Fill light on the other side of the camera or you could fill up the shadows by bouncing the key light back with a reflector. |
| Rembrandt lighting. Move up ant tilt down light for loop lighting |
Loop lighting. If you modify the height of the key light in the Rembrandt lighting set-up, positioning it at a higher point and tilting it down a bit, you'll see how the triangle of light will disappear and the shadow of the nose will move from the cheek all the way down, getting closer to the lips. This is called loop light and it helps to stylize a round face.
Butterfly lighting.
Also known as Hollywood lighting is considerably employed in fashion
photography. The key light is placed with the camera in front of the
model, high up an tilted down (just like Loop lighting). By this way it
models the face and produce a butterfly-shaped shadows right underneath
the nose. A fill light or a reflector underneath and pointing up is needed to fill up the shadow under the chin and to brighten the eyes. Because it creates large shadows you should avoid it with subjects with facial hair.
 |
| Butterfly or Hollywood lighting |
 Split lighting.
The Key light is placed on one side of the model at the eyes height. It
divides the subject in two: a bright side and a side in shadows.
Depending on where you position the model the effect will change: if the
light stands slightly behind the subject you'll have more shadows, if
it's slightly ahead you can brighten a bit the eye in shadow. It highlights textures and produce a sense of strength, mystery and menace;
so it is very suitable for male subjects. You can strengthen the mood
this set-up creates by adding an equal light-source on the other side of
the subject, as I did it in the picture on the left.
Split lighting.
The Key light is placed on one side of the model at the eyes height. It
divides the subject in two: a bright side and a side in shadows.
Depending on where you position the model the effect will change: if the
light stands slightly behind the subject you'll have more shadows, if
it's slightly ahead you can brighten a bit the eye in shadow. It highlights textures and produce a sense of strength, mystery and menace;
so it is very suitable for male subjects. You can strengthen the mood
this set-up creates by adding an equal light-source on the other side of
the subject, as I did it in the picture on the left. |
| Split lighting |
All of these lighting set-ups can be used with a single light-source. In the next post we will go through multi-lamp set-ups. Will you miss it?
––––––––––––––––––––––––––––––––––––––––––––––––––––––––––––––––
Know light. Lighting set-ups (II). Broad light and short light.
Read part I here.
There are several ways to dispose lights: it will depends on the scene we want to light, what part of the scene we want to highlight, what we don't want to, the mood we want to give the whole scene...
 The most common lighting set-up is the triangle set-up,
where one light is positioned on the right side of the camera and the
other one on the left side. Distance from the camera, angle, height of
the lights depend on your choice; someone will tell you one thing about
this matter while someone else will tell you exactly the opposite. It
doesn't really matter!
The most common lighting set-up is the triangle set-up,
where one light is positioned on the right side of the camera and the
other one on the left side. Distance from the camera, angle, height of
the lights depend on your choice; someone will tell you one thing about
this matter while someone else will tell you exactly the opposite. It
doesn't really matter!
The important issue is that the two lights differs in power:
the Key light has to be more powerful than the Fill light; by this we
will get some contrast and depth in the image and, most important of
all, the light in the scene will have a direction.
Depending on where lights are positioned on the side of the camera, only two situation can occur: each one of the two lights falls on different areas of the subject or they overlay summing its lights.


When
lights overlay on one part of the subject we will have a sum of the two
lights while the opposite side will be lit just by one. This will give
us the contrast of the scene. The most common contrast used is
the 1:3 contrast, where the brighter part of the subject is lit 3 times
more than the other side. It's the easiest contrast to get because you
just need the key light to be twice as powerful as the fill light.
In a portrait, if the brighter side of the subject faces the camera, we are using a broad lighting set-up; if it's the darker side facing the camera, we are using a short lighting set-ups.
 |
| Broad lighting |
Deciding
which one of those we should use it is not only a matter of mood
because these two lighting set-ups have a strong effect on a subject's
features: broad lighting widens while short lightning narrows.
 |
| Short lighting |
So, which set-up would you use for a round face?
Stay tuned for more lighting set-ups!
––––––––––––––––––––––––––––––––––––––––––––––––––––––––––––––––
––––––––––––––––––––––––––––––––––––––––––––––––––––––––––––––––
Know light. Lighting set-ups (I). The basis.
 Unlike natural light, artificial light can be controlled to our discretion in every way: direction, intensity, angle, colour... When in a studio, you have infinite options to light a subject;
there are photographers who only light with one lamp, others use 6, 7, 8
different lamps. There's not really a rule to decide the number of
light points to use: what is important is getting the illumination and
shadows you wanted with a light setting you are comfortable working
with.
Unlike natural light, artificial light can be controlled to our discretion in every way: direction, intensity, angle, colour... When in a studio, you have infinite options to light a subject;
there are photographers who only light with one lamp, others use 6, 7, 8
different lamps. There's not really a rule to decide the number of
light points to use: what is important is getting the illumination and
shadows you wanted with a light setting you are comfortable working
with.
If you are getting started to studio light, it may help you to know that there are some basics lighting set-ups most of photographers work with. But before explaining them it is essential to know the types of light yon can employ in a studio.
Key light. It gives the direction of light and the level of luminance of the scene (it's the most powerful lamp lighting the scene).
Fill light.
It is used to fill up the shadows and reduce contrast. It may fall all
over the scene or just on a part of it. It can be replaced by a
reflector bouncing the key light.
Rim light.
It is positioned behind the subject pointed to the subject's back. It
separates the subject from the background creating a halo around the
subject's outline.
Background light.
As it name suggests, it lights the whole background or some small parts
of it we want to emphasize. It can be also used for creating patterns
of light on a Cyclorama.
Hair light. Similar to rim light but positioned higher and pointed to the hair highlighting it.
Texture light.
Positioned on one side of the subjects. It is a must in fashion
photography because it reveals texture and the nature of the material.
Colour light. A frontal light which helps with colour saturation.

Now that you know the basis you are ready for the following step: how to position them. So stay tuned for the next post!
––––––––––––––––––––––––––––––––––––––––––––––––––––––––––––––––
How to shoot Landscapes. Some tips.
 Landscapes photography might seem easy
because your subject is there, waiting for you to arrive and shoot.
That is absolutely wrong. Of course it might happen to show in the right
place at the right time and find a magnificent view bathed by a perfect
light. But it's one out of a million chance. Landscape photography, like every kind of photography, needs to be planned.
Landscapes photography might seem easy
because your subject is there, waiting for you to arrive and shoot.
That is absolutely wrong. Of course it might happen to show in the right
place at the right time and find a magnificent view bathed by a perfect
light. But it's one out of a million chance. Landscape photography, like every kind of photography, needs to be planned.
You have to know the place you are going to photograph, where the best spot is, where you take the most of the light accordingly to the time you are there
You have to know when you'll have the best light in that place, not only the best one of the day but also of the year.
You have to know how colours change during year and seasons.
You have to know how the weather will evolve and if it will affect your photographs.
 Natural light is a very good quality light but it has limitations as well, the most important being the fact that we cannot dispose of it any time we like. High sun light is perfect for taking saturated images, sunset and sunrise produce delicate and contrasty photographs; overcast days might produce dull photos but they are perfect if you want to reproduce details because light is even and no-directional; haze and mist can add strong mood to the images, as well fog when strong shaped subjects are portrayed.
Graduated neutral density filters (GND) are a must
to reduce the high contrast between the sky and the land (yes, you
could bracket different exposed shots and produce an HDR image, but this
option is only available for digital camera users). Sliding up and down
the GND filter while taking a long exposure photo will help you to get
better looking images: not all the zones of the picture need to be
stopped down by the same value.
There are some filters that cannot be reproduced in editing softwares that you should carry with you while photographing landscapes: a Polarizing filter and a Neutral Density filter.
The first one lets light of a specific polarization pass and block
waves of other polarizations (which produces a colour saturation effect
and removes reflections). The ND filters, especially the "Big Stopper" a
10 stop ND filter, allows you to take long exposure photographs in full
sunlight without blowing the exposure.
 |
| Effect of Big Stopper filter at sunset |
––––––––––––––––––––––––––––––––––––––––––––––––––––––––––––––––
Know light. Use of natural light indoor

If you are shooting indoor you do not always need artificial light to expose your pictures: you can do a magnificent job using just available natural light. You just need a room with a window and sun light, of course. You could use the window as a back (or rim) light to create a silhouette of your subject or you can move around and use it as side light: depending on if you expose for the mid-tones or the brighter side of the subjects, you'll get different results.
A reflector or a white board might be very helpful: it's perfect to bounce and soften the light to create a more delicate mood or to fill up shadows; but be careful with the kind of white you are using!
some materials, for its composition or the way they have been washed,
produce ultraviolet light, resulting in a blue cast in the image. Depending on where the reflector is positioned it will create a different atmosphere.
If it is held in a higher position, imitating the sun, the look will
be very natural, if it is held down bouncing up the light, it will
create a more artistic effect.
 I prefer using north light when shooting indoor because it's softer and I don't have to deal with heavy deep shadows; however there are situations when direct sunlight is more suitable: when you want to play with high contrast or with shadows of the window drawn on the subject, for example.
As
always, the key of photographing indoor with natural light is to stay
creative: you have to move around, not only to get the best composition,
but to see how the characteristics of light change; you have to play
with light and shadow, stay alert and take advantage of opportunities: a single ray of light passing through a window slightly ajar it's enough to shoot a stunning image.
––––––––––––––––––––––––––––––––––––––––––––––––––––––––––––––––
––––––––––––––––––––––––––––––––––––––––––––––––––––––––––––––––
Know Light. Colour temperature. What it is and how to use it.
Why do my photos sometimes have an horrible blue or orange cast? What does that K stand for on my digital camera? If you are asking these questions you probably should want to know about Colour Temperature. So let's get to it!
Light is an electro-magnetic radiation which carries energy; one of it characteristic is frequency which is translated by our brain in colour. Different frequencies produce different colours.
The higher the frequency is, the higher the energy and bluer the
colour. Colour temperature is the scale on which this energy is measured
and unit measure is the Kelvin degree (K). The colour temperature
depends on the heating temperature of a metallic incandescent light,
from red, which needs the lowest temperature, through the orange, white
and up to blue (highest temperature).

Normal daylight has a temperature of 5500K
and we associate it with white light; a lower temperature energy
measures, for example, 2000K so the light will be red; on the other hand
if the temperature of the energy goes higher than 5500K, the light will
turn blue.
This is what
you need to remember in spite of the confusion common terminology may
cause by referring to red or orange light as warm and to blue light as
cold (because it is not related to the temperature but to the
psychological effect of the colours).
Why should you know this? to avoid a colour cast when taking picture in certain conditions.
If you are using a daylight balance film or the sunny setting in a
digital camera you will be correctly shooting coloured images at 5500K,
typical of a midday sunlight or a flash. If the colour temperature
rises (or lowers) and you not balance accordingly, your images will have
a blue cast (or a orange one): when taking pictures during an overcast
day, for instance, your images will turn out with a bluish tone; when
taking pictures inside a house or a restaurant they will be reddish.
To avoid this you need to white balance your camera,
if you are shooting digital, by changing the setting accordingly (from
the sunny setting to the cloud one, for example), or manually choosing
the colour temperature in kelvin degrees, or as well doing a
personalized white balance photographing a white paper or using an
expo-disc. If you are a film camera user using a daylight balanced film,
you can remove the colour cast by using filters: 81 and 85 series will
remove blue tones, 82 and 85 series will remove orange tones.
 But you do not always want to remove a colour tone.
One of the function of the light, and in my opinion the most important,
is to create a mood to enhance the message of the image: would you correct the orange and red tones in a picture of a sunset ?
Therefore you can create a warm and familiar feeling by adding orange
tones, while blue cast is related to feelings of cold and distance. The
use of psychological effects of the colours is another very interesting
theme which we will discuss in next posts. stay tuned!
But you do not always want to remove a colour tone.
One of the function of the light, and in my opinion the most important,
is to create a mood to enhance the message of the image: would you correct the orange and red tones in a picture of a sunset ?
Therefore you can create a warm and familiar feeling by adding orange
tones, while blue cast is related to feelings of cold and distance. The
use of psychological effects of the colours is another very interesting
theme which we will discuss in next posts. stay tuned!––––––––––––––––––––––––––––––––––––––––––––––––––––––––––––––––
Knowing Light. Natural light. How to use it in photography
Natural light is the most powerful and highest quality light we have to photograph yet it is the less controllable. It is normally divided into good light and bad light; this division is normally made by bad or inexpert photographers. There`s no such thing as bad light: light is always good, it's up to you to make the best use of it. Light has two functions: making possible the chemical or electronic process of recording an image on a film or a digital sensor and, which is most important, creating a mood to communicate something. So we should talk about adequate or not adequate light (for example, don't shoot a very romantic scene at noon in summer).
As the sun moves throughout the day the light changes its characteristics as its qualities depends on more factors:
the quality of the air, the presence of clouds, the pollution and the
soil. The early morning offers a very good bright light because the air
is neat and clear, there`s lot of contrast and pronounced shadows. The
afternoon light is similar but the air is not that clean so light isn't
as bright as it is in the morning. As the sunset is approaching the
light will turn in a very short period of time from white to pinky end
then to a varieties of orange and red tones. This is the golden light.
 |
| First minutes of sunset (Kodak Portra) |
 |
| Last minutes of sunset (KodalPortra) |
At midday the sun
is at its highest point: the colours are more saturated, the skin tone
is brighter and shadows are very visible and defined (think about the
ugly shadow below the nose or the eyes). Solutions? The sun will be always positioned in the south
(in the northern hemisphere) so it is as easy as changing the relative
positions with it, for example having the model with the back at the sun
if you are doing portraits. Of course you could fill the shadows with
artificial light like a flash, or bouncing the light into the subject
with a reflector. Another solution would be finding some shadows and
positioning there the model thus the image will result flat and less
dramatic.
 |
| Same subject at sunrise (KodakPortra) |
It is the same situation of an overcast day: the clouds are like a huge soft-box, diffusing light, lowering contrast,
flatting colours but eliminating shadows and enhancing details. But
natural light is not the one which comes directly from the sun, it can
be reflected from the sky for example. This is what they call the north
light (or the south light, depending on in which part of the globe you
are reading this blog), a soft and delicate shadow free light.
Land can work as a reflector too: think of the snow in a mountain or the wet sand of a beach in low tide.
Other things to remember when shooting with natural light are haze and rain.
The first one makes lines and forms fade out; you need a skyline
filter or polarize to get rid of it or, if you are shooting on black and
white, a yellow filter. The rain will help with the saturation: it
clears the atmosphere so, after raining, colours will look brighter.
You now have all what you need to master natural light so go out there and start practising!
––––––––––––––––––––––––––––––––––––––––––––––––––––––––––––––––
Knowing light. Types of light. An introduction
Almost all of the literature about light starts explaining what light is.

Honestly, as a photographer, I don't really care if light is made of an emission of particles or an emission of waves. What I do care of is the quality of light and its intensity.
By the quality of light we can achieve better looking images, a
suitable colour rendering index (CRI) and colour appearance (colour
temperature) for the mood; playing with its intensity we can achieve the
correct exposure (I mean for correct the exposure we want).
Light can be either natural (the sun) or man-made (light generator) provided directly from its source or indirectly (bounced).
 |
| Natural light, the golden hour |
Each and every one of these types of light produces different results in the emulsion or in the digital pixels.
During the next posts we will analyze all these types of light one by
one to see those differences and how to use them for our benefit.
So stay tuned!
We all thought its Camera ---> Light ---> Action, but there are so many things involving in lighting of a cinematography. Thanks for the post!
ReplyDeleteRegards,
Creately
I'm with Shalin, great outline of everything that goes into lighting. He are more Indoor Lighting Tips for anybody looking for more.
ReplyDeleteIt is one of the best post from other.
ReplyDeletediesel generator maintenance & new generator sales
Great post, how to use natural light in photography is a very important skill, thank you for sharing this useful information.
ReplyDelete